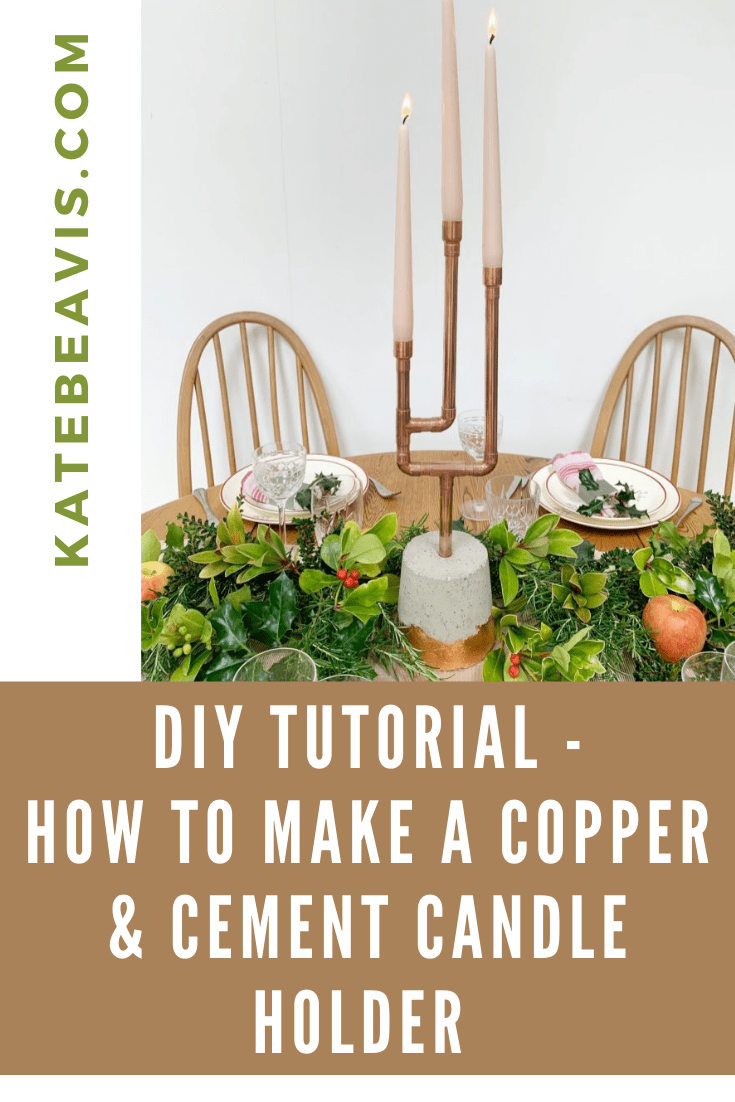
Copper piping and cement are usually found on the building site but with this clever make will look amazing in your home for a modern urban look. I recently made this copper pipe candle holder for our Christmas table but of course it will look lovely all year round!
(This post contains affiliate links)


Materials Needed For Your Copper Pipe Candle Holder:
- 15mm copper piping – I used 82cm in total
- 2 x 15mm copper T joints
- 3 x 15mm copper elbow joints
- 3 x 22mm to 15mm reducers
- Copper leaf
- Ready mix mortar or cement & sand
- Water
Equipment Needed:
- 15mm copper pipe cutter
- Ruler and pen
- Ice cream pot
- Bucket to mix the cement and trowel
- Drill to cut a 15mm hole
- Copper cleaner and soft cloth
- Tweezers
- Strong glue suitable for metal
- PVA glue and paintbrush
- Fine paintbrush
- Sand paper

Step 1: Design your copper pipe candle holder on a piece of paper to decide on the length of copper to cut. My measurements are as follows:
- Base piece: 22cm
- Short upright: 4cm and 8cm
- Medium upright: 20cm
- Long upright: 20cm
- 2 x horizontal pieces: 4cm each
Step 2: Measure your required lengths and mark with a pen. Using the copper pipe cutter, cut the lengths.


Step 3: At this stage I would add all the joints/fittings to make sure that you are happy with the design.

Step 4: Using a soft cloth and copper cleaner, polish up all the pieces before you glue them together or make any cement.


Step 5: To make the base, you need a mould. I used a luxury ice cream pot – the base needs to be large enough to support your design. Mark on the base a 15mm circle centrally by drawing around a piece of piping.


Step 6: Using a drill, cut out the hole. Position the base piece of pipe through this hole so it is flush with the open side of the ice cream pot and sticking out of the hole. This needs to remain here when you add the cement mix.

Step 7: In a bucket mix up some cement mixture. I used builders sand and added concrete, then water to mix together. Mix well.


Step 8: Holding the base piece of pipe centrally, add the cement into the pot. I sat the pot and pipe on top of a flower pot so that it was supported. As the cement starts to harden keep checking that the pipe is still central and straight. If you don’t do this, your candle holder will not work! Leave to set which can take 24 hours.

TOP TIP:
You need all the air bubbles to rise to the top so the cement sets without air holes. Do this by gently tapping the pot. However, I didn’t mind the odd imperfection in my make!

(There are smaller ones here which I will share how to make in another post!)
Step 9: While that is setting, glue all the other joints and piping together. Don’t add the final reducers where the candles sit into, in case you want to change the lengths later.

Step 10: When the cement is dry, gently tap the base of the pot to loosen the base out of the pot.

Step 11: You may need to gently sand the edge of the base with sandpaper for a smooth finish.

Step 12: Clean up the protruding piece of copper with the copper polish being careful to not get it on the base.
Step 13: Lie the base on its side and apply PVA glue with a paint brush to the area you want the copper leaf on. I didn’t make this line perfectly straight as I wanted to create a gradual effect.

Step 14: Using tweezers carefully lift a sheet of copper leaf and position onto the glued area. Carefully smooth it down with your finger.

Step 15: When the glue is dry, carefully wipe away excess copper leaf using a small dry paint brush. If you create any holes in the copper leaf, simply add smaller bits on top and then again wipe away any excess.

Step 16: Glue the base to the rest of the candle holder.
Step 17: When you are happy with the size of the candle holder as a whole, attach the reducers and glue into place.

This first appeared in Take A Break Magazine.


For more copper pip makes have a look at my other blog posts: another copper pipe candelabra , a bike clock and a magazine rack.